 状态更新
状态更新

# 流程概览
# render阶段的开始
render阶段开始于performSyncWorkOnRoot或performConcurrentWorkOnRoot方法的调用。
这取决于本次更新是同步更新还是异步更新。
# commit 阶段的开始
commit阶段开始于commitRoot方法的调用。其中rootFiber会作为传参。
我们知道,render阶段完成后会进入commit阶段。
# 创建 Update 对象
在React中,有如下方法可触发状态更新(排除SSR相关):
- ReactDOM.render
- this.setState
- this.forceUpdate
- useState
- useReducer
这些方法调用的场景各不相同,它们是如何接入同一套状态更新机制呢?
答案是:每次状态更新都会创建一个保存更新状态相关内容的对象,叫
Update。 在render阶段的beginWork中会根据Update计算新的state。
# 从fiber到root
现在触发状态更新的fiber上已包含Update对象。
我们知道render阶段是从rootFiber开始向下遍历。那如何从触发状态更新的fiber得到rootFiber呢
答案是:调用markUpdateLaneFromFiberToRoot (opens new window)
该方法做的工作可概括为:从触发状态更新的fiber一直向上遍历到rootFiber,并返回rootFiber。
由于不同更新优先级不近相同,所以过程中还会更新遍历到fiber的优先级
# 调度更新
现在我们拥有一个rootFiber,该rootFiber对应的fiber树中某个Fiber节点包含一个Update。
接下来通知Scheduler根据更新的优先级,决定以同步还是异步的方式调度本次更新。
这里调用的方法是ensureRootIsScheduled (opens new window)。
if (newCallbackPriority === SyncLanePriority) {
  // 任务已经过期,需要同步执行render阶段
  newCallbackNode = scheduleSyncCallback(
    performSyncWorkOnRoot.bind(null, root)
  );
} else {
  // 根据任务优先级异步执行render阶段
  var schedulerPriorityLevel = lanePriorityToSchedulerPriority(
    newCallbackPriority
  );
  newCallbackNode = scheduleCallback(
    schedulerPriorityLevel,
    performConcurrentWorkOnRoot.bind(null, root)
  );
}
2
3
4
5
6
7
8
9
10
11
12
13
14
15
这是ensureRootIsScheduled最核心的一段代码。
其中,scheduleCallback和scheduleSyncCallback会调用Scheduler提供的调度方法根据优先级调度回调函数执行。
可看到,这里调度的回调函数为:
performSyncWorkOnRoot.bind(null, root);
performConcurrentWorkOnRoot.bind(null, root);
2
即render阶段的入口函数。
至此,状态更新就和我们熟知的render阶段连接上了
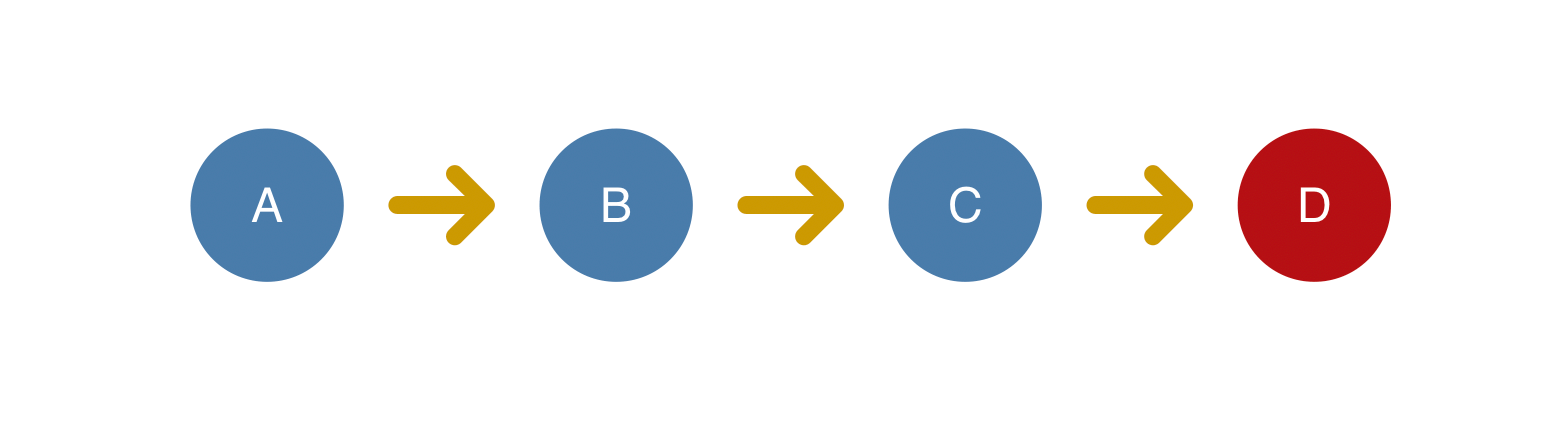
触发状态更新(根据场景调用不同方法)
    |
    |
    v
创建Update对象(接下来三节详解)
    |
    |
    v
从fiber到root(`markUpdateLaneFromFiberToRoot`)
    |
    |
    v
调度更新(`ensureRootIsScheduled`)
    |
    |
    v
render阶段(`performSyncWorkOnRoot` 或 `performConcurrentWorkOnRoot`)
    |
    |
    v
commit阶段(`commitRoot`)
2
3
4
5
6
7
8
9
10
11
12
13
14
15
16
17
18
19
20
21
# 心智模型
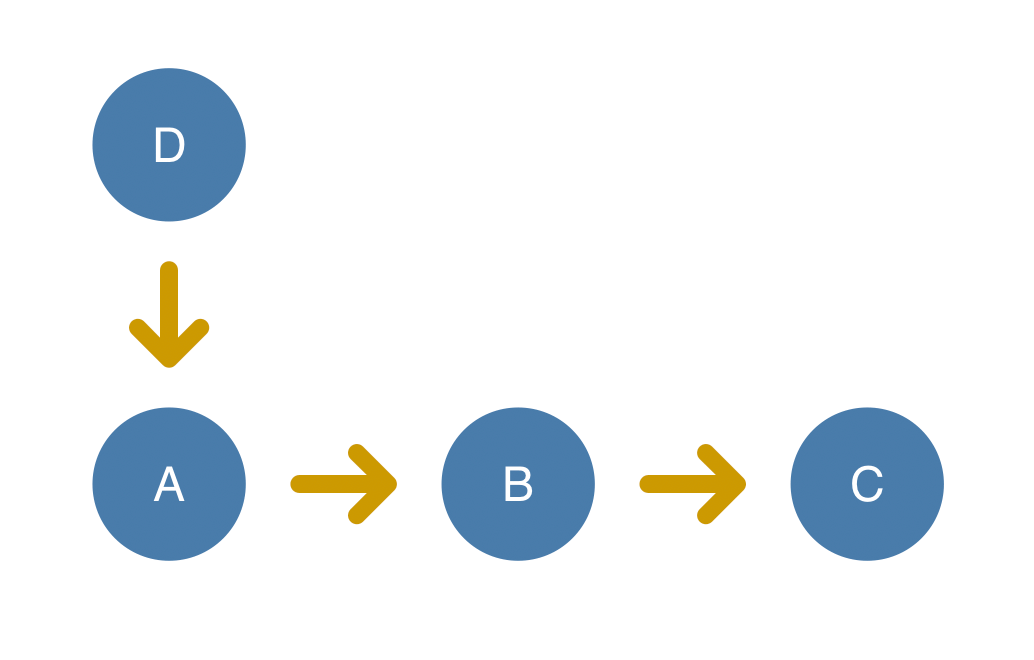
# 同步更新的React
我们可将更新机制类比代码版本控制。
在没有代码版本控制前,在代码中逐步叠加功能。一切看起来井然有序,直到遇到一个紧急线上bug(红色节点)
 为修复此bug,我们需先将之前的代码提交。
在React中,所有通过
为修复此bug,我们需先将之前的代码提交。
在React中,所有通过ReactDOM.render创建的应用都是通过类似的方式更新状态。
即没有优先级概念,高优先级(红色节点)需排在其他更新后面执行。
# 并发更新的React
当有了代码版本控制,有紧急线上bug需修复时,我们暂存当前分支的修改,在master分支修复bug并紧急上线。
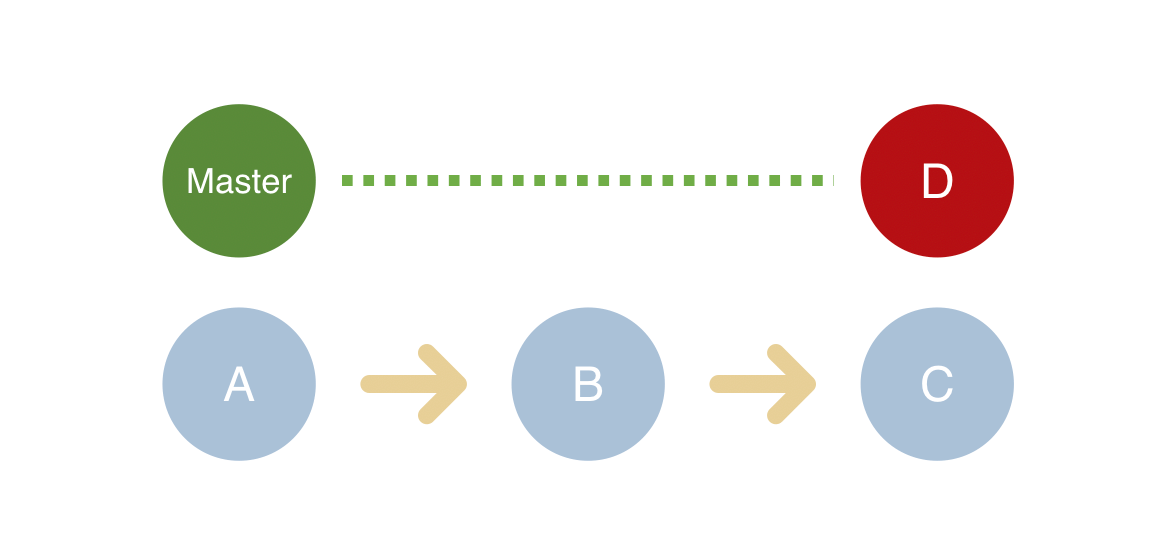 bug修复上线后通过
git rebase命令和开发分支连接上。开发分支基于修复bug的版本继续开发。
 在React中,通过
ReactDOM.createBlockingRoot和ReactDOM.createRoot创建的应用会采用并发的方式更新状态。
高优先级(红色节点)中断正在进行中的低优先级(蓝色节点),先完成render - commit流程。
待高优更新完成后,低优更新基于高优更新的结果重新更新。
# Update
上一节,我们知道状态更新流程开始后首先会创建Update对象。可将Update类比心智模型中的一次commit。
# Update的分类
我们先了解Update的结构 首先,我们将可触发更新的方法所隶属的组件分类:
- ReactDOM.render -- HostRoot
- this.setState -- ClassComponent
- this.forceUpdate -- ClassComponent
- useState -- FunctionComponent
- useReducer -- FunctionComponent
可看到,共有三种组件(HostRoot | ClassComponent | FunctionComponent)可触发更新
由于不同类型组件工作方式不同,所以存在两种不同结构的Update,其中
ClassComponent与HostRoot共用一套Update结构,FunctionComponent单独使用一种Update结构。
# Update 的结构
ClassComponent与HostRoot(即rootFiber.tag对应类型)共用同一种Update结构。
对应的结构如下:
const update: Update<*> = {
  eventTime,        // 任务时间,通过 performance.now() 获取的毫秒数。该字段在未来会重构
  lane,             // 优先级相关字段,类比心智模型中需求的紧急程度
  suspenseConfig,   // Suspense 相关,暂不关注
  tag: UpdateState, // 更新的类型,包括:UpdateState | ReplaceState | ForceUpdate | CaptureUpdate
  payload: null,    // 更新挂载的数据,不同类型组件挂载的数据不同。对于 ClassComponent, payload 为 this.setState 的第一个传参。对于 HostRoot, payload 为 ReactDOM.render 的第一个传参。
  callback: null,   // 更新的回调函数。即在 commit 阶段的 layout 子阶段提到的回调函数

  next: null,       // 与其他 Update 连接形成链表
};
2
3
4
5
6
7
8
9
10
Update由createUpdate (opens new window)方法返回。
# Update 与 Fiber 的联系
我们发现,Update 存在一个连接其他 Update 形成链表的字段 next。联系React中另一种以链表形式组成的结构 Fiber,他们间有关联吗?答案是肯定的。 双缓存机制一节我们知道,Fiber节点组成Fiber树,页面中最多同时存在两棵Fiber树:
- 代表当前页面状态的 current fiber树
- 代表正在 render阶段的 workInProgress Fiber 树
类似 Fiber节点 组成Fiber树,Fiber节点 上的多个 Update 会组成链表并被包含在
fiber.updateQueue中。 什么情况下一个Fiber节点会存在多个Update?
onClick() {
  this.setState({
    a: 1
  })

  this.setState({
    b: 2
  })
}
2
3
4
5
6
7
8
9
上面在一个ClassComponent中触发this.onClick方法,内部调用两次this.setState,这会在该fiber中产生两个Update。
Fiber节点最多同时存在两个updateQueue:
current fiber保存的updateQueue即current updateQueueworkInProgress fiber保存的updateQueue即workInProgress updateQueue在commit阶段完成页面渲染后,workInProgress fiber树变为current fiber树,workInProgress fiber树内Fiber节点的updateQueue就变成current updateQueue
# updateQueue
updateQueue有三种类型,其中针对HostComponent的类型在completeWork一节已介绍过。
剩下两种类型和Update的两种类型对应
ClassComponent与HostRoot使用的updateQueue结构如下:
const queue: UpdateQueue<State> = {
    baseState: fiber.memoizedState,   // 本次更新前该Fiber节点的state,Update基于该state计算更新后的state。可将其类比心智模型中的master分支
    firstBaseUpdate: null,            // 本次更新前该Fiber节点已保存的Update。以链表形式存在,链表头为firstBaseUpdate,链表尾为lastBaseUpdate。
    lastBaseUpdate: null,             // 之所以在更新产生前该Fiber节点内就存在Update,是由于某些Update优先级较低所以在上次render阶段由Update计算state时被跳过。可将其类比心智模型中执行git rebase 基于的commit(节点D)
    shared: {                         // 触发更新时,产生的Update会保存在shared.pending中形成单向环状链表。
      pending: null,                  // 当由Update计算state时这个环会被剪开并连接在lastBaseUpdate后面
    },                                // 可将其类比心智模型中本次需提交的commit(节点ABC)
    effects: null,                    // 数组。保存update.callback !== null 的 Update
  };
2
3
4
5
6
7
8
9
updateQueue由initializeUpdateQueue (opens new window)方法返回。
# 例子
updateQueue 相关代码逻辑涉及大量链表操作,比较难懂,举个例子讲解下updateQueue的工作流程。
假设有个fiber刚经历commit阶段完成渲染。
该fiber上有两个由于优先级 过低所以在上次的render阶段并没处理的Update。它们会成为下次更新的baseUpdate。
我们称其u1、u2,其中u1.next === u2,用-->表示链表的指向
fiber.updateQueue.firstBaseUpdate === u1;
fiber.updateQueue.lastBaseUpdate === u2;
u1.next === u2;
fiber.updateQueue.baseUpdate: u1 --> u2
2
3
4
现在我们在fiber上触发两次状态更新,这会先后产生两个新的Update,为u3、u4。
每个update会通过enqueueUpdate (opens new window)插入updateQueue队列上
当插入u3后
fiber.updateQueue.shared.pending === u3;
u3.next === u3;
2
shared.pending的环状链表,用图表示为:
fiber.updateQueue.shared.pending:   u3 ─────┐
                                     ^      |
                                     └──────┘
2
3
接着插入u4:
fiber.updateQueue.shared.pending === u4;
u4.next === u3;
u3.next === u4;
2
3
shared.pending的环状链表,用图表示为:
fiber.updateQueue.shared.pending:   u4 ──> u3
                                     ^      |
                                     └──────┘
2
3
shared.pending会保证始终指向最后一个插入的update。
更新调度完成后进入render阶段
此时,shared.pending的环被剪开并连接在updateQueue.lastBaseUpdate后面
fiber.updateQueue.baseUpdate: u1 --> u2 --> u3 --> u4
接下来遍历updateQueue.baseUpdate链表,以fiber.updateQueue.baseState为初始state,依次与遍历到的每个Update计算并产生新的state(该操作类比Array.prototype.reduce)
在遍历时若有优先级低的Update会被跳过。
当遍历完成后获得的state,就是该Fiber节点在本次更新的state(源码中叫memoizedState)
render阶段的Update操作由processUpdateQueue (opens new window)完成。
state的变化在render阶段产生与上次更新不同的JSX对象,通过Diff算法产生effectTag,在commit阶段渲染在页面上。
渲染完成后workInProgress fiber树变为current fiber树,整个更新流程结束。
# 深入理解优先级
# 什么是优先级
状态更新有用户交互产生,用户心里对交互执行顺序有个预期。React根据人机交互研究的结果中用户对交互的预期顺序为交互产生的状态更新赋予不同优先级 具体如下:
- 生命周期方法:同步执行
- 受控的用户输入:如输入框内输入文字,同步执行
- 交互事件:如动画,高优先级执行
- 其他:如数据请求,低优先级执行
# 如何调度优先级
我们知道,React通过Scheduler调度任务。
具体到代码,每当需要调度任务时,React会调用Scheduler提供的方法runWithPriority (opens new window)。
该方法接收一个优先级常量 (opens new window)与一个回调函数作为参数。回调函数会以优先级高低为顺序排列在一个定时器中并在合适的时间触发。
# 例子
优先级最终会反映到update.lane变量上。当前我们只需知道这个变量能够区分Update的优先级
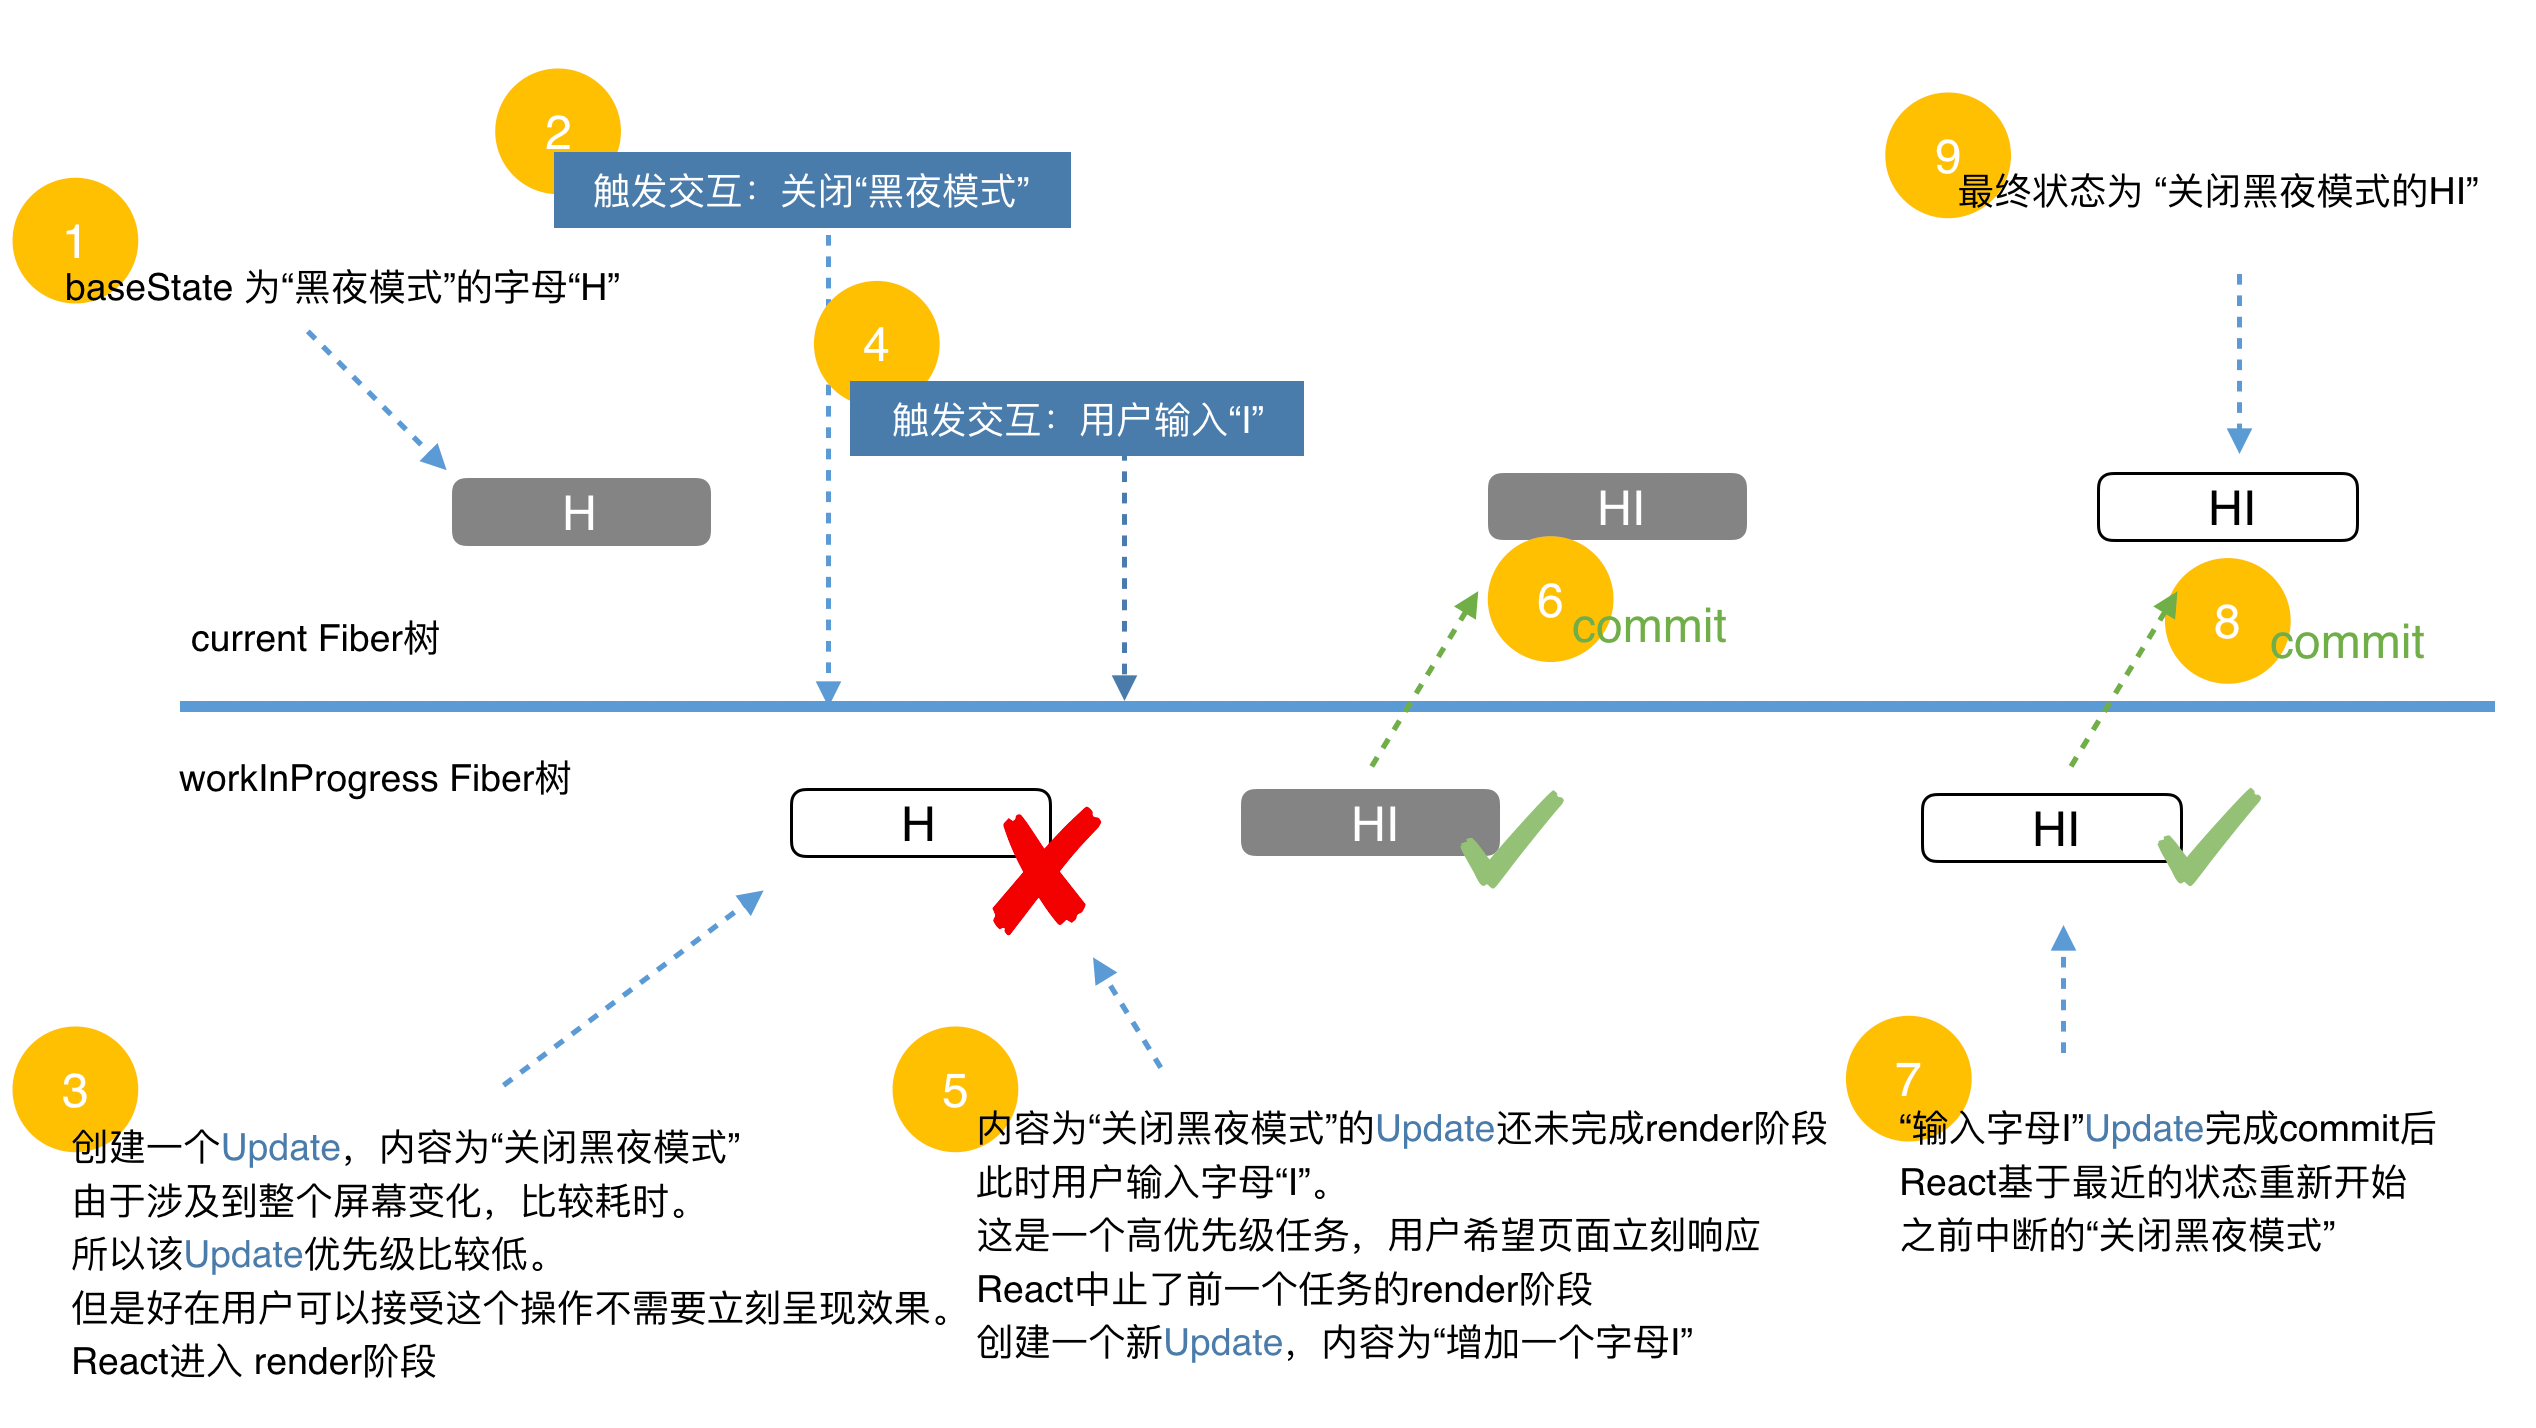 这个例子中,有两个Update。将关闭黑夜模式产生的Update叫u1,输入字母I产出的Update叫u2。
其中u1先触发并进入render阶段。其优先级较低,执行时间较长
这个例子中,有两个Update。将关闭黑夜模式产生的Update叫u1,输入字母I产出的Update叫u2。
其中u1先触发并进入render阶段。其优先级较低,执行时间较长
fiber.updateQueue = {
  baseState: {
    blackTheme: true,
    text: 'H'
  },
  firstBaseUpdate: null,
  lastBaseUpdate: null
  shared: {
    pending: u1
  },
  effects: null
};
2
3
4
5
6
7
8
9
10
11
12
在u1完成render阶段前用户通过键盘输入字母I,产生u2。u2属于受控的用户输入,优先级高于u1,于是中断u1产生的render阶段。
fiber.updateQueue.shared.pending === u2 ----> u1
                                     ^        |
                                     |________|
// 即
u2.next === u1;
u1.next === u2;
2
3
4
5
6
由于u2优先级高于u1,接下来进入u2产生的render阶段。
在processUpdateQueue中,shared.pending环状链表会被剪开拼接在baseUpdate后面。
需明确一点,shared.pending指向最后一个pending的update,所以实际执行时update的顺序为:
u1 -- u2
接下来遍历baseUpdate,处理优先级合适的Update(这一次处理的是更高优的u2)
由于u2不是baseUpdate中的第一个update,在其之前的u1由于优先级不够被跳过。
update 间可能有依赖关系,所以被跳过的update及其后面所有update会成为下次更新的baseUpdate。
最终u2完成render - commit阶段。
fiber.updateQueue = {
  baseState: {
    blackTheme: true,
    text: 'HI'
  },
  firstBaseUpdate: u1,
  lastBaseUpdate: u2
  shared: {
    pending: null
  },
  effects: null
};
2
3
4
5
6
7
8
9
10
11
12
在commit阶段结尾会再调度一次更新。在该次更新中会基于baseState中firstBaseUpdate保存的u1,开启一次新的render阶段。
最终两次Update都完成后的结果如下:
fiber.updateQueue = {
  baseState: {
    blackTheme: false,
    text: 'HI'
  },
  firstBaseUpdate: null,
  lastBaseUpdate: null
  shared: {
    pending: null
  },
  effects: null
};
2
3
4
5
6
7
8
9
10
11
12
我们可看见,u2对应的更新执行了两次,相应的render阶段的生命周期钩子componentWillXXX也会触发两次。这也是为什么这些钩子会被标记为unsafe_。
# 如何保证状态正确
现在我们基本掌握了updateQueue的工作流程。还有两个疑问:
- render阶段可能被中断,如何保证
updateQueue中保存的Update不丢失? - 有时候当前状态需依赖前一个状态。如何在支持跳过低优先级状态的同时保证状态依赖的连续性?
# 如何保证Update不丢失
在render阶段,shared.pending的环被剪开并连接在updateQueue.lastBaseUpdate后面。
实际上shared.pending会被同时连接在workInProgress updateQueue.lastBaseUpdate与current updateQueue.lastBaseUpdate后面。
具体代码见这里 (opens new window)
当render阶段被中断后重新开始时,会基于current updateQueue克隆出workInProgress updateQueue。由于current updateQueue.lastBaseUpdate已保存了上一次的Update,所以不会丢失。
当commit阶段完成渲染,由于workInProgress updateQueue.lastBaseUpdate中保存了上一次的Update,所以workInProgress Fiber树变成current Fiber树后也不会造成Update丢失
# 如何保证状态依赖的连续性
当某个Update由于优先级低而被跳过时,保存在baseUpdate中的不仅是该Update,还包括链表中该Update之后的所有Update。
考虑如下例子:
baseState: ''
shared.pending: A1 --> B2 --> C1 --> D2
2
其中 字母代表该Update要在页面插入的字母,数字代表优先级,值越低优先级越高。 第一次render,优先级为1
baseState: ''
baseUpdate: null
render阶段使用的Update: [A1, C1]
memoizedState: 'AC'
2
3
4
其中B2由于优先级为2,低于当前优先级,所以他及其后面的所有Update会被保存在baseUpdate中作为下次更新的Update(即B2 C1 D2)
这么做是为了保持状态的前后依赖顺序。
第二次render,优先级为2
baseState: 'A'
baseUpdate: B2 --> C1 --> D2
render阶段使用的Update: [B2, C1, D2]
memoizedState: 'ABCD'
2
3
4
注意这里的baseState并不是上一次更新的memoizedState。这是由于B2被跳过了。
通过以上例子发现,React保证最终的状态一定和用户触发的交互一致,但中间过程状态可能由于设备不同而不同。
# ReactDOM.render
# 创建fiber
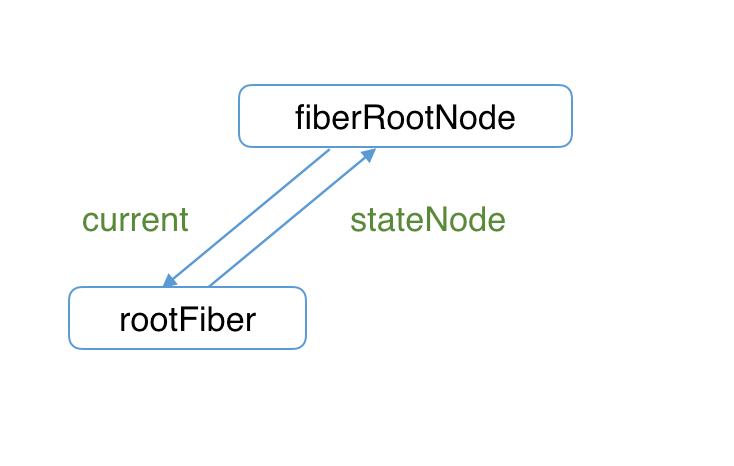
从双缓存机制一节知道,首先执行ReactDOM.render会创建fiberRootNode和rootFiber。其中fiberRootNode是整个应用的根节点,rootFiber是要渲染组件所在组件树的根节点。
这一步发生在调用ReactDOM.render后进入的legacyRenderSubtreeIntoContainer (opens new window)中。
// container指ReactDOM.render的第二个参数(即应用挂载的DOM节点)
root = container._reactRootContainer = legacyCreateRootFromDOMContainer(
  container,
  forceHydrate,
);
fiberRoot = root._internalRoot;
2
3
4
5
6
legacyRenderSubtreeIntoContainer方法内部会调用createFiberRoot方法完成fiberRootNode和rootFiber的创建及关联。并初始化updateQueue。
export function createFiberRoot(
  containerInfo: any,
  tag: RootTag,
  hydrate: boolean,
  hydrationCallbacks: null | SuspenseHydrationCallbacks,
): FiberRoot {
  // 创建fiberRootNode
  const root: FiberRoot = (new FiberRootNode(containerInfo, tag, hydrate): any);

  // 创建rootFiber
  const uninitializedFiber = createHostRootFiber(tag);

  // 连接rootFiber与fiberRootNode
  root.current = uninitializedFiber;
  uninitializedFiber.stateNode = root;

  // 初始化updateQueue
  initializeUpdateQueue(uninitializedFiber);

  return root;
}
2
3
4
5
6
7
8
9
10
11
12
13
14
15
16
17
18
19
20
21
根据以上代码,我们可在双缓存机制基础补充上rootFiber到fiberRootNode的引用。
 这里 (opens new window)可看这一步的代码。
# 创建Update
我们以做好组件的初始化工作,接下来就等待创建Update来开启一次更新。
这一步发生在updateContainer (opens new window)方法中。
export function updateContainer(
  element: ReactNodeList,
  container: OpaqueRoot,
  parentComponent: ?React$Component<any, any>,
  callback: ?Function,
): Lane {
  // ...省略与逻辑不相关代码

  // 创建update
  const update = createUpdate(eventTime, lane, suspenseConfig);

  // update.payload为需要挂载在根节点的组件
  update.payload = {element};

  // callback为ReactDOM.render的第三个参数 —— 回调函数
  callback = callback === undefined ? null : callback;
  if (callback !== null) {
    update.callback = callback;
  }

  // 将生成的update加入updateQueue
  enqueueUpdate(current, update);
  // 调度更新
  scheduleUpdateOnFiber(current, lane, eventTime);

  // ...省略与逻辑不相关代码
}
2
3
4
5
6
7
8
9
10
11
12
13
14
15
16
17
18
19
20
21
22
23
24
25
26
27
值得注意的是其中update.payload = {element}
这是我们在Update一节中介绍的,对于HostRoot,payload为ReactDOM.render的第一个传参。
# 流程概览
至此,ReactDOM.render的流程就和我们已知的流程连接上了。
整个流程如下:
创建fiberRootNode、rootFiber、updateQueue(`legacyCreateRootFromDOMContainer`)
    |
    |
    v
创建Update对象(`updateContainer`)
    |
    |
    v
从fiber到root(`markUpdateLaneFromFiberToRoot`)
    |
    |
    v
调度更新(`ensureRootIsScheduled`)

    |
    |
    v
render阶段(`performSyncWorkOnRoot` 或 `performConcurrentWorkOnRoot`)
    |
    |
    v
commit阶段(`commitRoot`)
2
3
4
5
6
7
8
9
10
11
12
13
14
15
16
17
18
19
20
21
22
# React 的其他入口函数
当前React共有三种模式:
legacy,这是当前React的使用方式。它可能不支持一些新功能blocking,开启部分concurrent模式特性的中间模式。目前在实验中。作为迁移到concurrent模式的第一个步骤concurrent,面向未来的开发模式。之前讲的任务中断/任务优先级都是针对concurrent模式。
*:legacy模式在合成事件中有自动批处理的功能,但仅限于一个浏览器任务。非React事件想使用这个功能必须使用 unstable_batchedUpdates。在blocking模式和concurrent模式下,所有的setState在默认情况下都是批处理的。
**: 会在开发中发出警告
模式的变化影响整个应用的工作方式,所以无法只针对某个组件开启不同模式。
基于此原因,可以通过不同的入口函数开启不同模式:
legacy--ReactDOM.render(<App />, rootNode)blocking--ReactDOM.createBlockingRoot(rootNode).render(<App />)concurrent--ReactDOM.createRoot(rootNode).render(<App />)虽然不同模式的入口函数不同,但是他们仅对fiber.mode变量产生影响,对我们在流程概览中描述的流程并无影响。
# this.setState
# 流程概览
this.setState内会调用this.updater.enqueueSetState (opens new window)方法中
Component.prototype.setState = function (partialState, callback) {
  if (!(typeof partialState === 'object' || typeof partialState === 'function' || partialState == null)) {
    {
      throw Error( "setState(...): takes an object of state variables to update or a function which returns an object of state variables." );
    }
  }
  this.updater.enqueueSetState(this, partialState, callback, 'setState');
};
2
3
4
5
6
7
8
在enqueueSetState (opens new window)中就是我们熟悉的从创建update到调度update的流程了。
enqueueSetState(inst, payload, callback) {
  // 通过组件实例获取对应fiber
  const fiber = getInstance(inst);

  const eventTime = requestEventTime();
  const suspenseConfig = requestCurrentSuspenseConfig();

  // 获取优先级
  const lane = requestUpdateLane(fiber, suspenseConfig);

  // 创建update
  const update = createUpdate(eventTime, lane, suspenseConfig);

  update.payload = payload;

  // 赋值回调函数
  if (callback !== undefined && callback !== null) {
    update.callback = callback;
  }

  // 将update插入updateQueue
  enqueueUpdate(fiber, update);
  // 调度update
  scheduleUpdateOnFiber(fiber, lane, eventTime);
}
2
3
4
5
6
7
8
9
10
11
12
13
14
15
16
17
18
19
20
21
22
23
24
25
对于ClassComponent,update.payload为this.setState的第一个传参(即要改变的state)
# this.forceUpdate
在this.updater上,除了enqueueSetState外,还存在enqueueForceUpdate (opens new window),当我们调用this.forceUpdate时会调用他。
可看到,除了赋值update.tag = ForceUpdate;及无payload外,其他逻辑与this.setState一致。
enqueueForceUpdate(inst, callback) {
    const fiber = getInstance(inst);
    const eventTime = requestEventTime();
    const suspenseConfig = requestCurrentSuspenseConfig();
    const lane = requestUpdateLane(fiber, suspenseConfig);

    const update = createUpdate(eventTime, lane, suspenseConfig);

    // 赋值tag为ForceUpdate
    update.tag = ForceUpdate;

    if (callback !== undefined && callback !== null) {
      update.callback = callback;
    }

    enqueueUpdate(fiber, update);
    scheduleUpdateOnFiber(fiber, lane, eventTime);
  },
};
2
3
4
5
6
7
8
9
10
11
12
13
14
15
16
17
18
19
那么赋值update.tag = ForceUpdate;有何作用呢?
在判断ClassComponent是否需更新时有两个条件需满足:
const shouldUpdate =
  checkHasForceUpdateAfterProcessing() ||
  checkShouldComponentUpdate(
    workInProgress,
    ctor,
    oldProps,
    newProps,
    oldState,
    newState,
    nextContext,
  );
2
3
4
5
6
7
8
9
10
11
checkHasForceUpdateAfterProcessing: 内部会判断本次更新的Update是否为ForceUpdate。即如果本次更新的Update中存在tag为ForceUpdate,则返回truecheckShouldComponentUpdate(opens new window): 内部会调用shouldComponentUpdate方法。以及当该ClassComponent为PureComponent时会浅比较state与props。 所以,当某次更新含有tag为ForceUpdate的Update,那么当前ClassComponent不会受其他性能优化手段(shouldComponentUpdate|PureComponent)影响,一定会更新。